Showing posts with label Recollections. Show all posts

Sunday, June 30, 2013

May Cards

Long time, no blog.  I wish I could say I've been living it up and have been too busy but sadly, I've just been too lazy.  

My first card was made for my friend, Jennifer's birthday. Here are the supplies: 
  • Paper from The Paper Studio "Tie Dye Lime"
  • Flowers from Dahlia Layered Burlap Flowers "Little Yellow Bicycle"
  • 1 paper lunch sack
  • I got the free printable maze from here: The Joy of Stamping.  


I bought the paper months before making the card.  I immediately thought of Jennifer when I saw this tie-dyed cloth paper.  I struggled with what I was going to use to decorate it with but decided "natural" was the theme I was going to go with.  Jennifer once showed me her Smash journal and inside I noticed a finger labyrinth.  So I was lucky enough to stumble upon the website with a free printable maze.  It also had the cute phrase "you're a-maze-ing".  I printed it on the lunch sack to keep with the natural theme.  

Jennifer and her nature card


Next up, Mother's Day!  
  • 1 fuchsia colored sold paper.
  • 1 turquoise colored solid paper
  • The Paper Studio "Poteeka  Butterflies"
  • Turquoise & White Silk Flowers by The Paper Studio "Spare Parts"
  • Monogram 3-D Sticker Embellishment Letters (in M & O) from The Paper Studio "La Petites"


My mom and her Mother's Day card


And a birthday card for my friend, Wendy!  
  • 1 piece of black solid paper
  • Bright Pink & Black Silk Flowers by the Paper Studio "Spare Parts"
  • Glittery leopard print paper from the Recollections "All Girl" paper pad
  • Solid pink paper for birthday sentiment
  • Stickles
  • "Happy Birthday" stamp


I outlined the glittery paper in Stickles

Wendy and Rhoda with the card.

I made Wendy some Scotcheroos and monster cookies!  


And here's a graduation card for my friend, Stacy's daughter Justice
  • The blue paper is by Bazzill "Mediterranean"  
  • The red paper is by Bazzill "Ruby Slipper"
  • Graduation gown and stars by Jolee's Boutique "Kindergarten Grad" (even though my grad was a high schooler!)
  • The "Congrats" sticker was by Soft Spoken


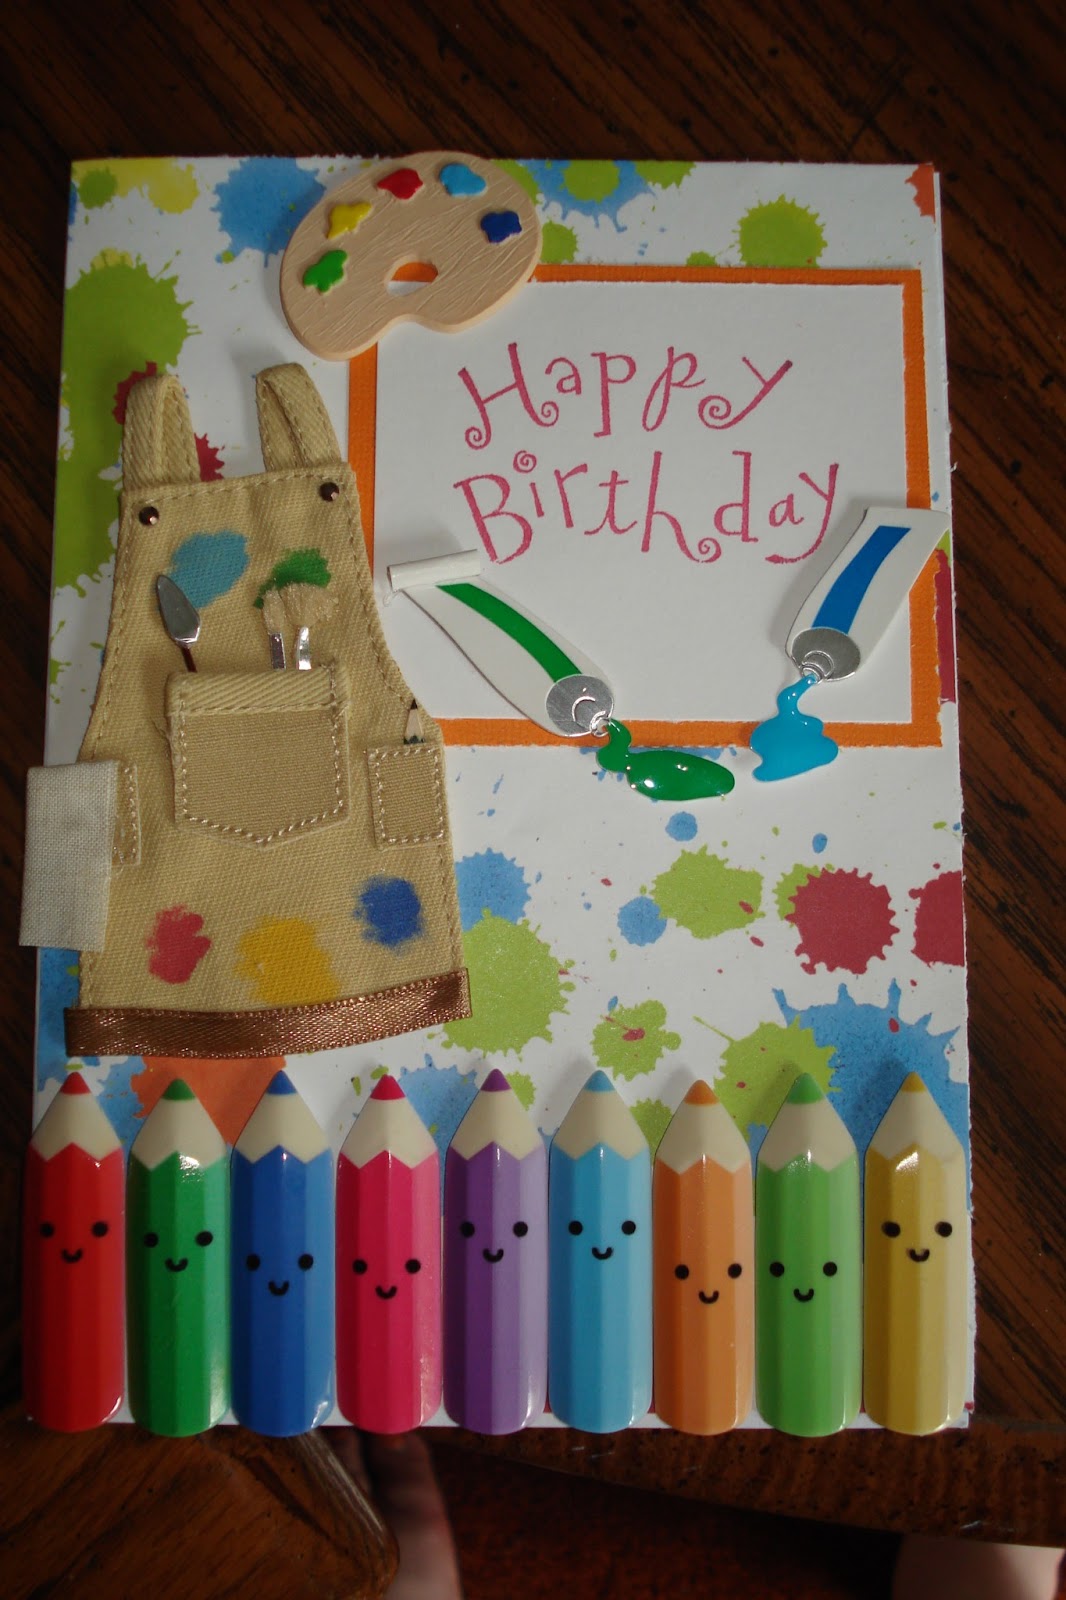
And last but not least, an artist themed birthday card for Miss Miranda!  
  • Paper is "Recollections "Multi Paint Splatter"
  • Smock and paint stickers from Jolee's Boutique "Artist"
  • Jolee's Boutique Stickers "Bright Colored Pencils"
  • Solid paper in orange
  • Solid paper in white
  • "Happy Birthday" stamp


7 year old Miranda holding up her card!  


I hope you enjoyed all of my cards!  See ya soon!  

Love, 
Miss Jules

The soundtrack to most of this card making:


Sunday, April 21, 2013

A Mermaid Card

Good afternoon!  I'm busy working away in my craft room today.  I can't tell you the last time my craft room has been cleaned top to bottom.  I can't even tell you the last time my craft table top has been spotless.  I've added so many fun craft paper and tools to my stash in the past year, I haven't had a chance to put it all away.  I actually plan on doing a craft room show and tell in the near future here in this blog so look out for that.

Let's get down to business!  I have another birthday card today.  This one is for my dearest friend Stacy.  She turned 35 years old last week and we celebrated over the weekend.  She wanted to be treated to dinner and a movie for her birthday so we ended up seeing Evil Dead.  What did I think of the movie?  I was entertained but it was more gruesome than scary.  That's pretty much how I feel about a lot of horror films of this generation.  I'm glad I saw it and will continue to see today's horror films hoping one of them will terrify me.  I hear they're remaking Poltergeist.  I'm kind of excited about that because the first one scared me.  Then again I was about the same age as Carol Anne when I saw it, had the same console television as her and was convinced I would get sucked into the damn thing.

Here's the fabulous birthday card I made for Miss Stacy!  I'm still learning how to color hair.  Unfortunately, I didn't have all the Copic markers to make the dark blonde that I wanted to.  Michael's had a limited selection and didn't have any in the E50's.  So I will be ordering some online soon along with a the colors for redheads and brunetttes.


The stamp came from Simply Betty Stamps.  It's a digital stamp from their Merkids line and it's on sale right now for $2, along with the rest of the Merkids.  I got the Christmas and Halloween stamps too.  

The sandy colored paper was from Core'dinations.  I couldn't find the actual name of it.  What I can tell you is I bought it from Joann's, it's kind of a sand color and it's glitzy.  

I bought the DCWV Linen Closet matstack cardstock pack that come in size 4.5 x 6.5 inches.  The pack comes with 72 pieces, some matte with texture, some shiny and some glittery.  For this card, I chose a matte blue with texture to place over the top of the sandy cardstock.  Then I chose a lighter blue glittery piece from the same pack and cut it into an oval shape with my Creative Memories oval cutter.   

Next I placed my Copic colored mermaid in the oval.  I adhered her with 3D stamps.  

I made the Happy Birthday tag with all three of the same paper, layered.  I used the boxy crazy scissors for the outside of the tag in hopes it would resemble a sand castle.  Nailed it!  

I found the My Mind's Eye "The Sweetest Thing" enamel dots at Michaels.  I placed them around the mermaid's head to look like bubbles.  

 I used some seashells for the bottom.  You can get these at most craft stores.  I just used regular Scotch glue.  

And to add some elegance, I adhered the Recollections Adhesive Faux pearls.  

Warning: Do not attempt to send this card in the mail! 

The sentiment comes from Fiskars "Make a Wish" quotes.

Stacy, the mermaid come to life!

Thanks for stopping by!  I loved making this card and I love the person I made it for!  

Whozits and whatzits galore, 
Jules

Wednesday, April 10, 2013

You're So Glam, You Sweat Glitter!

Hola!  Man, it's chilly out there.  I can't wait to crawl into my warm bed.

I have quite the shiny jewel for you all!  I made a glittery card for my friend Sara's birthday on April Fool's Day.


I got the green glitter paper from a Recollections 12 x 12 paper pad called "All Girl".  I also used the pink version to go under the "Happy Birthday" sign.  

All the little butterflies came on a roll from Recollections "Glitter on a Roll".  The big butterfly was borrowed from my mom and it also came from Recollections "Glitter Stickers".  

Very bright and Springy!  

Happy Birthday, Sara!   I hope you had a wonderful day!  I saw this picture the other day and thought of you, only because I know how much you love camping and you know how much I don't.  

Love, 
Jules 

Sunday, April 7, 2013

Embossed Birthday Card

Happy Sunday, all.  I took a break from blogging but am returning with full force!  March, April and May are busy card months for me.  And with the winter over, I'm itching to get out and about with other activities that I can possibly share.  

The first birthday card in this Spring series was made for my sister in law, Jill.  Jill turned 41 but according to her, she's 42.  Quite possibly the only woman to make herself a year older.  :)  


What I used: 
  • black card stock
  • piece of paper from the My Mind's Eye "The Station" paper pad
  • clear stamps from Tim Holtz visual artistry Stampers Anonymous Collection
  • Happy Birthday die cut from the K&Company 76 piece Beyond Post Marks Flora Die Cuts
  • heating tool
  • embossing ink
  • embossing powder in ruby red
  • scalloped corner cutter
  • round corner cutter
The black card stock is cut down to 5 x 7 inch.  I adhered it to a 5 x 7 inch card and cut the right corners with a round corner cutter.  

I really liked the old look of the printed paper.  And I loved the bird cage.  I cut that paper down smaller than the black card stock and used the scalloped corner cutter on all 4 of its corners. I centered it in the black card stock and adhered.  

I found the cool Tim Holtz clear stamps at Michaels.  I chose the flowers and bird stamps.  I thought the flowers looked antique, almost like a pressed flower saved in a bible or a class year book.  I dipped it in the embossing ink and stamped it on the printed paper.  I wanted it to overlap the printed paper and black card stock.  Then I sprinkled the red embossing powder over the top of the stamped ink.  Next I shook the powder off, making sure the stamped ink was perfectly covered with the powder.  Then I used the heating tool over the powdered ink until it became shiny.  Since I was using a powder that had glitter in it, I had to be careful because it burns easily.  In fact, I did end up burning it so part of the flowers looked sparkly and part looked kind of like burnt sienna.  It actually ended up working well for the flowers, adding to that dried pressed flower look.  I did the same thing with the clear bird stamp.  

And lastly, I adhered the red "Happy Birthday" die cut at the bottom of the card, slightly over the flower stem.  

Happy Birthday, Jill!  


That was my card.  I hope you liked it.  I can't wait to do some more embossing in the future.

Coming up: 
  • several birthday cards
  • shadow box garden workshop
  • outdoor stepping stones
You've got to roll with the punches to get to what's real, 
Miss Jules  <3


Tuesday, November 27, 2012

Someone New In My Craft Room

I had the pleasure of hanging out with my 10 year old nephew, Jackson during my long Thanksgiving weekend.  It was a long time coming.  As these kids get older, they get busy!  Between boys scouts, sports and jobs, it's hard to pin down dates.

I made my nephew watch one of my favorite movies of all time, "Little Shop of Horrors".  I knew he would love it because I made his cousin Blake and his big sister Chandler watch it when they were younger and they both loved it.  I'm the aunt that makes her nephews and nieces watch movies from the 80's, you know, back when movies were good.   :)    

I even took Jackson Black Friday shopping at midnight with my friend Jennifer.  I filled him with powdered doughnuts and Mt Dew (Lisa, don't read this!).  He was really psyched about going...and then 10:30 rolled around and he passed out on my chaise lounge!  Thankfully, I was able to wake him up and we were on our way.

Jennifer and Jackson, waiting outside of Ulta, ready to get their makeup shopping on!  Doesn't Jack look so excited!  

There was quite the crowd at Ulta.  I don't think Jackson was quite ready for the frenzy because one moment he was right beside us and the next moment...gone!  Luckily, we knew something like that might happen so Jennifer told him to look for her since she's tall and wearing a white coat.  I found him wandering in the skin care section a few minutes later.  I asked him where he ended up.  He said he was over on the other side in the drugstore brand.  Oh, Jackson, you'll learn.  Aunt Julie likes the high end section on Black Friday!

Here's my haul!  


Too Faced "The Triple Threat"  $18
  • Deluxe Primed & Poreless Skin Smoothing Face Primer 
  • Glamour Gloss Volumizing Lip Gloss  
  • Deluxe Chocolate Soleil Matte Bronzer
I've used the bronzer before. It's been in a couple of Too Faced sets I've bought before.  I like it although I have to watch it since I'm so pale.  It smells delicious!  I've never used their face primer before.  I highly recommend this primer.  It's so smooth!  And I've been enjoying the lip gloss.  Not too sticky, smells good, and makes my lips look nice and full.  

tarte "Balanced & Beautiful Amazonian Clay Essentials Kit"  $22

  • Full size Amazonian clay 12 hour blush in flush
  • Full size Amazonian clay waterproof cream eyeshadow in slate 
  • Full size bamboo cream eyeshadow brush
Tarte is quickly becoming one of my favorite brands.  Their blushes are amazing!  I like their natural formulas (it's called high-performance naturals) and that they use recycled and recyclable materials for the packaging.  The blush that came in this set is normally $25 alone.  The cream shadow retails for $19.  The cream shadow will work great alone or as a base.  I've tried it both ways and it's good quality.  The blush is really bright so I try not to be so heavy handed with it.  I'm part albino though.  

Laura Geller  "Baked Eye Dreams Duo with Brushes"  $20
  • shadow quad in "Pink Sunset"
  • shadow quad in "Sandbar"
  • 2 eyeshadow brushes
Laura Geller is new to me.  I've heard some of my favorite gurus rave about it.  This is why I love the holiday sales.  You get the opportunity to try great high end products at an affordable price.  I've only tried this dry but you can apply these baked shadows wet.  I love the nice subtle shimmer Sandbar gives.  Pink Sunset reminds me of Neopolitan ice cream.  It also looked very nice when I applied it.  I'm a fan of baked shadows.  If you get a chance, try out some Laura Geller shadows.  According to the website, these retail at $30 each.  It does look like the packaging is a bit different than what I got but the shadow is the same and the same size.  

Bedhead shampoo and conditioner 

I haven't tried this yet but it was on sale for $6.99 each so I'll givet it a try soon.  These retail for $15.99 each.

The rest of the stuff was not on sale but I did get to use my $3.50 Ulta coupon!  Woo hoo!  

I was so happy with my Tarte purchase, I ended up ordering the Sephora exclusive "Carried Away" set.  I can't wait to try it out.  I should be getting it soon.  I hope to be able to play around with it over the weekend.  Might even blog about it.  

Jackson and I made birthday cards for my step mom, Mary.  

This is his card!  

Jack picked out the polka dot paper himself.  You can't tell from the picture but the polka dots are risen so there's a nice texture.  I showed him how to cut the paper with my Fiskars paper trimmer.  He loved doing that!  

The embossed green dots cardstock is from DCWV and it's called "Nana's Kids Print".  
The hamster "Got Cake?" clear stamp is from Inkadinkado "Humorous Birthday".
The inside birthday cake and "happy birthday" stamp is from Fiskars "Birthday Party".  

I think Jack liked crafting although he did start to get a little crazy with the Stickles.  I think he liked the cutting and the taping part the most.  He lacked focus, just like any other 10 year old boy!  

Here's mine!  


The "Birthday Girl" paper is from Reminisce in the Princess collection.  I cut it to 5x7. 
The purple embellishments is Doodlebug Designs "Paper Frills".  These come 12 inches long so I cut it so I had one 5 inch and one 7 inch.  Perfect!  
The flowers are 3 petals from Recollections Floral Embellishments.  
I found a pretty brad to stick in the middle of the petals.  
The lady on the pony is a clear stamp from Inkadinkado "Humorous Birthday".  Mary likes Maxine and this felt kind of Maxinish.  


Happy Birthday, Mary!  I hope you liked your cards!  

I'm just a mean, green mother from outer space and I'm bad,
Jules


Tuesday, July 24, 2012

Corpse Bride Birthday Card For Josi

Happy Tuesday, all!  I hope you're beating the heat.

Josi turned 11 years old on July 18th.  She loves Tim Burton movies and even dressed up as the Corpse Bride a couple of Halloweens ago.  So naturally I thought of her when I saw the Tim Burton line from Simply Betty Stamps.  I've been holding on to this stamp for a very long time just waiting for Miss Josi's birthday.  I don't believe the stamp is available in rubber form anymore but the digi stamp, along with a whole bunch of other cool Burton stamps, are available at the above link.  I used Copic markers to color in.  As you can probably tell, I need to get more blue pens.  I don't do so hot coloring white people skin and I can't say I'm too impressed with my ability to do corpse skin either.  Practice, practice, practice...


The purple paper with the dark purple swirlies is from My Mind's Eye/"29th Street Market"/Carefree Adorable.  It is a double sided 12x12.  I used my Creative Memories oval cutter to cut the other side of the paper which is the light lavender paper under the stamp. I then centered the lavender paper and stamp over an iridescent eggplant colored card stock from Recollections.  


I found the "oh happy day" stamp at Michael's (in the dollar bin, always!).  I thought it was funny and was perfect for this card because it doesn't really fit.  I distressed it with 4 different Distress inks.  They are Worn Lipstick, Shabby Shutters, Spiced Marmalade and Dusty Concord.  I put it in the corner of the card and slapped some cutesie bling on the side.  

I have a rubber stamp pack that I bought at Michael's by Autumn Leaves Clear Stamps by Rhonna Farrer called "Flowers".  I used black ink and stamped them on all four corners of the card, overlapping all the layers of paper.  I then went over the stamps in Stickles "Cotton Candy".  

Yay, she got it in the mail and she liked it!

Happy Birthday, Josi!  And I meant what I said in your card.  I totally want to do a Tim Burton marathon with you.  Popcorn, candy, Mountain Dew and all!

Nice effin' model (honk honk), 
Jules

P.S.  The soundtrack to making this card.


Monday, May 7, 2012

May Unicorns Fart Rainbows On Your Special Day

Good evening!  Do I have one hell of an acid flashback birthday card for you!

One of my bestest friends, Jennifer,  just celebrated her birthday on May 4th (Star Wars day!).  I bought a 12x12 of rainbow paper (Recollections in "Rainbows") which I happened to show Jen on one of our scrapbooking days.  She said how much she liked it and that she wanted her birthday card to be made with it.

I had to think about what goes well with rainbows.  And what says "Jen"?  And then it came to me.  A UNICORN!  And unicorns just happen to be Jen's favorite animal (lol...total inside joke) so I started searching for a unicorn digi stamp.

I ended up finding the lovely digi stamp from The Greeting Farm.  Melonheadz had the free mushroom digi stamp.  


Copic markers used for the unicorn:
RV11
B14
V15
C5
Flowers: 
R08
YR04
V15
Butterflies: 
Y13
YR04
Grass: 
YG03
Mushrooms:
G17
YG03
E09
R27
YR04
Y13
Stems: 
E09
E15

I used the 3D pads under the unicorn and "Happy Birthday" sign.  

And the inside included one of my favorite birthday sentiments.  


Well, you know how they say "great minds think alike"?  Check out the Hallmark card Tracy got for Jen.  


Maybe I should start making cards for Hallmark?  Or maybe Jennifer should get some normal friends?  ha ha   :)

I may have mentioned this before but sometimes I find my closest friends to be the hardest to make cards for.  I haven't figured out why that is.  

The birthday girl with her card
We ended up celebrating at a Japanese grill called Osaka (so, so, so delicious!) and I got to make a chocolate trifle, which was rich and yummy!  Jennifer got a free dinner and I got a gift card for being honest about incorrect change in my favor.  Score!  

Happy birthday, Jennifer!  And I mean it, I really do hope unicorns farted rainbows on your special day!

Legends can be now and forever, 
Jules  

Thursday, March 22, 2012

Birthday Owls

Good day, all!  It's been awhile since I've posted on here but that will be changing soon.  I have lots of birthdays in the Spring months so I'll be posting many a card.  Also, as you may know, I'm really into makeup.  And I want to get more into it with reviews and picture tutorials and such.  I understand if some of the 6 of you (lol!) are not makeup fans and will not be offended if you do not read.  I plan to keep all posts separate so you may see more than one post from me in one day.  I just wanted to give you a heads up.  


Also, still no job.  It's starting to get to me because I want to move on with my life but I'm still remaining positive. I have to admit that having all of this time to myself is getting me down a bit.  I find myself wishing I had a "daytime" friend who likes going for walks/hiking and drinking coffee but all of you are at work or are just not into that sort of thing.  Oh, well.  I'm finding other ways to keep myself busy!  And all the things around my house that I thought would be done in my first month off are slowly being started and/or finished which is making me very happy.  But if any of you want to go for a walk/hike, day or night, let me know.  I can use all the exercise I can get!


Okay, enough about me.  Let's get to this birthday card.  


This card was for my sister in law, Jill, who celebrated her birthday on March 20th.  Once again, HAPPY BIRTHDAY, Jill!  She is married to my oldest brother, Todd and is the mother to my nephew, Zach.  


The glittered polka dot paper is from the brand My Mind's Eye in their Lost and Found 2 line.  This paper was called "Sunshine Forever Dotted Paper".  I bought it from Archiver's and I believe it was $0.99.  I loved the colors and the glitter.  I just used your standard brown and tan card stock for the center.  


The owl stamps were Michael's Recollections brand.  The sticker pack came with 4 owls and the branch but I'm saving the other owl for another card.  


As you may or may not know, paper that has glitter on it is very hard to glue things to.  Because of this, I had to use the 3 brads in the corner.  Those are also from the Recollections line.  If you have any tips on adhering to this type of paper, comment below.  I would love your input because I've run into this problem more than a couple of times.  


I love owls but it's hard to come up with cutesie sentiments in regard to them.  You can ask my friends Jennifer and Nicki who helped me in my attempt to come up with something clever.  This is what I came up with...


Lame, I know.  But I think we all agree it was the best out of the ideas kicked around that day.  


That's my card!  I hope you liked it.  Also, feel free to comment below on what sentiment you would have used for the owls.  


Thanks, 
Jules

Sunday, January 29, 2012

Octopus's Garden

As I mentioned on my Facebook page yesterday, Jennifer and I went to a scrapbooking event at the Cedar Rapids Public Library.  It was free and gave us a great opportunity to hang out with other scrapbookers and to use other people's tools.  I made 2 birthday cards and a two page scrapbook layout.  I am going to show you how I made one of the cards and then give you a peek at my scrapbook layout.  

So here's the scoop on the birthday card!  

I was shopping at a little gift shop in the Amana's some time ago and found a sheet of paper put out by Reminisce called "Pink Bubbly Fish".  It's double sided.


My first thought was this...
I'd like to be, under the sea...

And then I thought how great this paper would be for my niece's upcoming birthday card.  You see, I love cute paper like this.  And now that my nieces and nephews are getting older and I don't have any little girls of my own...yet, I'm running out of opportunities to use cute paper like this.  I mean, this paper doesn't exactly go with a 34 year old's lifestyle.  But it is perfect for a 3 year old and my niece Gracie is turning 3 next month!

I'm using both sides of the paper for this card.  One thing I love about two sided paper is the top of the paper that has the bar code and brand name on it typically doubles as extra design paper.  It allows you to utilize the whole sheet.  This paper was perfect for that because it created a fun and matching line to separate the "sea" from the stripes.  So I cut the "sea" side down to about 2/3 the size of the card and the stripe side was about 1/3 the size.  I made sure to use the flower part of the top of the striped paper to use as a divider between the two sides.  Then I glued them to my card.  

See how the flower line matches the color scheme yet acts as a great divider between the two patterns?  I love it!  


The next step involves the use of the Cricut Expression 2.  My friend Jennifer let me use hers.  She helped me cut out these accents.  The paper is your typical card stock you buy at Michaels.  I chose 3 different colors.  We used the Cricut Essentials Flower3 pattern for the dark pink and light pink.  The dark pink was made slightly bigger than the hot pink.  Then we used the #3 Alphabet Font 2 on the lavender paper, creating the cute "3".  

And then I layered them, using my glue.  

Next I glued the layered flower to my card, placing it on the flowered line.  I found some great stickers at Michaels from their Recollections line that seemed to match the card perfectly.  I stuck the octopus on.  I'm not sure if you can tell by the pic, but there are some sticker bubbles added too.  And then I used some Stickles in Frosted Lace all over the sea life in the top part of the card.  

  
And lastly, I used a Happy Birthday Balloon clear stamp for the sentiment inside of the card.  I'm not sure the brand on that stamp.  Sorry!  But I'm pretty sure it's from Michaels.  

I am in love with this card!  I almost don't want to give it to my niece!  But I still have some leftover scraps from the 12x12 paper so I have a feeling I'll be using this again.  

And now I'm seriously thinking about getting a Cricut.  

And here's my layout!

The pictures I scrapbooked are from a year ago.  My friend Stacy and I went bowling with her kids on a cold night.  And here is what transpired.  
 "Let's bowl, let's bowl, let's rock and roll!"  <----10 points if you know what that's from!

The cute bowling ball and pins sticker on the first page is from the beloved Jolee's brand.  The bowling ball and pins on the second page are from Karen Foster Design in "High Score".  I borrowed Jennifer's Cricut once again for the words "Strike" and "Spare".  I now wish I would have cut out the word "Split".  I'm very happy with this layout.  I will be doing another bowling page for 2012 and Jennifer and I have already come up with the layout using her Cricut.  Who knows, maybe I'll be using MY Cricut.    :giggle:  

Thanks for viewing.  I'll have another blog at the end of this week showcasing the other card I made. 

~Jules